Pages

Followers

Friday, 8 January 2016

New DT for Open Minded Crafting Fun Challenge Blog


Announcing that I have been accepted on the Design Team of the
Open-Minded Crafting Fun Challenge Blog Group

Am thrilled to be part of the Team and am looking forward to working with all the wonderfully talented
Design Team Members.

To View present and new Design Team Members for Open-Minded Crafting Fun Challenge Group
you can click HERE!


Friday, 1 January 2016

1st January 2016 ~ World Wide Open Design Team Challenge ~ Lil Scarecrow

My DT Project for the 
World Wide Open Design Team Challenge #07
1st January 2016


Come along and join in this Challenge which is designed strictly for all of the DT's all over the World.
You can enter our Challenge HERE!
"Anything Goes"


Card Recipe:

  • I have used My Besties Lil Scarecrow IMG642
  • Copics: E33 E00 E53 E37 E08 E18 E79 E35 E31 E25 E49
  • Designer paper from Glitz It On
  • Tag Die: Whimsy
  • Honeycomb Die: Tim Holtz
  • Frame Die: Spellbinders S6-012
  • ColorBox fluid Chalk Ink ~ Chestnut Brown
  • 1" Double Sided Satin Ribbon
  • Bow made with Bow It All
  • White cardstock from American Crafts
  • 25mm Flowers from old stash
  • Hand Made Calico Flower by Funky Flairs
  • Hessian Strip from The Scrap Shack
  • Large Brown Flower from Crafty Fox

1st January 2016 ~ My Besties Meet at the Scrappers Corner DT Project

My DT Project for My Besties Meet at the Scrappers Corner
Challenge #20

I have used My Besties Zen Art Digital IMG880 and you can find this little beauty right HERE!

Come along and join in this great fun Besties Challenge, always "Anything Goes" must use a Besties.
You can join in the challenge HERE! 

Card Recipe:
  • My Besties Zen Art Image IMG880 find Digital HERE! 
  • Copics: G21 C1 C0 C2 BV29B00 BG40 B02 VG000 BG09
  •  Designer Paper "My Minds Eye" which I have stenciled
  • Circled Stencil and Bird Stencil
  • White Cardstock American Craft
  • Martha Stewart Edger Hand Punch
  • Die: Flourish Marianne Design LR0192
  • Die: Tag ~ Spellbinders Shapeabilities S5-030
  • Black Ink and foam dauber
  • Say it with Crystals 10mm and 6mm 
 

Tuesday, 22 December 2015

Xmas Card ~ 22nd December 2015

Xmas Card
  
Card Recipe:
  • My Besties IMG642 ~ your can find her HERE! 
  • Copics: E000 E00 E11 R20 E08 E35 E33 E51 V05 V06 RV29 T08 G14 YR07 B100 B32 B29 23 B24 C7
  • White Loose Glitter used over the top of True Snow and Glitter Glue
  • Fundamentals Vellum Dots
  • Die: Merry Christmas Cheery Lynn Designs
  • 1" White Satin Ribbon 
  • Flowers from old stash
  • Blue and White Cardstock from American Crafts
  • Red Bella Glitz Cardstock
  • Polka Dot Large and Small Designer paper from Crafters Choice Primary Basics 12x12 Book

Tuesday, 1 December 2015

1st December 2015 ~ Fashion Fair IMG809

DT Project for
1st December 2015
You can join this fun Besties Challenge HERE!

Products used:

Card Recipe:
  • Sherri Ann Baldy's My Besties Digital Stamp IMG809 and you can find her HERE! 
  • Designer Cardstock from "My Minds Eye"
  • Red Glitter Cardstock
Challenges entered:

1st December 2015 ~ IMG811 Fashionista

My DT Project


Card Recipe:
  • Sherri Ann Baldy's My Besties Image IMG811 Fashionista Digital Stamp and you can find her HERE! 
  •  Copics: (Face) E000 E00 E11 R20 R27 ~ (Hair) E29 E71 W1 W3 W7 ~ (Dress, glasses, Bow & Flower) R27 R59 Zig Glitter Pen Pink C1 C3 C5 C7 B110 B100 Zig Glitter Pen Grey
  • Designer Black/White Papers from Sugar n Spice Mono Positive and Negative
  • Red Cardstock from American Crafts
  • Black Glitter Paper
  • X-Press it Colouring Card
  • Die: Spellbinders Card Creator Belly Band
  • Crystals from Craft Essentials "Creatives"
  • 1" Red Wire Ribbon with Silver Thread
  • Teddy Bear Crystal from Mary Flower
  • Thank you Tag from Netty's Card Blog Freebie Downloads and you can find them HERE!

1st December 2015 ~ IMG846 Fashionista

DT Project ~ I have made my Fashionista Orange/Black project from this original project which inspired me to make the above design for my DT. 
 

Card Recipe:
  • Sherri Ann Baldy's My Besties Fashionista Image Number IMG846 and you can find her HERE!
  • Cardstock Black and Orange from American Crafts
  •  Embossing folder from Craft Concepts "Secret Garden"

1st December 2015 ~ IMG806 Fashionista

My DT Project for
My Besties Meet at the Scrappers Corner Challenge #19

Come along and join in this great fun Challenge.
You can join right HERE!


Card Recipe:

  • Sherri Ann Baldy's My Besties Digital Stamp IMG806 and you can find her HERE!
  • Grey/White Check Designer Paper from Primary Basics
  • Black Rhinestones from Craft Essentials 
  • Pink and Black Cardstock from American Crafts
  • Ticket Tag made from free Download from Netty's Cards and you can find HERE!


Tuesday, 24 November 2015

Paul's 40th birthday Card ~ 25th November 2015


40th Birthday Card
Card Recipe:
  • Dr Digi Digital Stamp
  • Coloured with Copics: E000 E00 E11 C3 C5 E33 E13 Y02 Y06 Y15 Y08 E18 E19 R08 R24 R27 R37
  • Bella Glitz Red Cardstock 
  • American Crafts Cardstock Yellow and Black
  • Die: Spellbinders Card Creator 
  • Die: Lea'bilities Tags 
  • 40 cut with Cricut
Challenges entered: 

Sunday, 22 November 2015

Dad's 90th Birthday Card ~ 27th November 2015


Card I made for my Dad's 90th Birthday
for 27th November 2015
Card Recipe:
  • Digital Stamp from Dr. Digi
  • Black Glitter Cardstock from Bella Glitz
  • Red Cardstock from American Crafts
  • Copics: E000 E00 E11 R08 R14 R24 E59 E57 E25 E15 C1 C3 C5
  •  Metal Clocks from old stash
  • Designer Papers from Sugar'n'spice Hollywood 12x12 Book
  • 90 cut with Cricut

Sunday, 1 November 2015

1st November 2015 ~ The Good Witch


DT project for the
World Wide Open Design Team Challenge #05

Come along and join in the great challenge which is open to anyone on a DT throughout the World. Theme is always "Anything Goes" and use any Digital or Stamp.
You can enter Challenge HERE! 


Recipe for Honeycomb Doll:


  • Honeycomb creation made from patterns designed by Greg Sukendro master sculptor
  • I have used the head of the Digital Stamp from My Besties ~ Image Scan0001 Halloween Boo and you can find her HERE! 
  • Copics: B110 E000 E00 E11 R20 R27 R17 R46 YG41 YR31 Y02 Y08 Y35 Y17 YR23 C5 C2
  • Witch's Honeycomb Dress made from 80gsm Gold paper
  • Background Papers from The Bewitched Stack
  • Gloves and upper Dress made in Glitter gold Paper and Glitter black cardstock
  •  1" Gold Satin Ribbon
  • Gold Stars for Dress from old stash
  • 10mm Gold Pearls
  • Black Ink on out edges of Honeycomb

Challenges Entered:
Inkspirational Challenge

1st November 2015 ~ Fashion Screen

My DT project for
Meet at the Scrappers Corner Challenge #18

Come along and join in this great fun challenge, you can enter 3 entries and you must use a Besties.
Enter the Challenge HERE!


Card Recipe:

  • My Besties 3D Pre-Printable Sheet ~ you can find this pre-printable HERE! 
  • White Designer Cardstock from Stampin'Up
  • 1+1/2" Aqua Satin Ribbon
  • Bow made with "Bow It all"
  • Crystals from Durmaz
  • Pink Blossoms from Jolee's Boutique
  • Brown Cardstock from American Craft
  • Designer Cardstock for Dress from Hobby Fun Co. Ltd ~ No. GP311
  • Aqua Cardstock from American Crafts
  • Patterns for Dress and Cupboard from Paper Craft Inspiration Magazine
  • Mirror silver Cardstock from American Crafts
  • Edger Punch from Martha Stewart
  • White Gel Pen for Faux Stitching
  • 10mm Pearls from "Say it in Pearl"
  • 6mm Aqua Crystal from "Say it with Crystals"
 

Tuesday, 27 October 2015

Honeycomb Diva Doll Instructions

Hello Friends,

Annette here and I am featuring here today a wonderful creation which I found recently in the Cardmaking Magazine.
There are full instructions on how to make this Diva Doll but I have made mine with a twist.
This is the Doll which was featured by the Magazine and created by master sculptor Greg Sukendro :-
  • This is my interpretation where I utilized Greg Sukendro's Honeycomb Pattern plus the body pattern (but I have made some slight amendments to the patterns to suit my own Diva Doll):-
  •  
  •  
  •  Made this Bride Doll Card for my Nephews Wedding


  • Made these two Honeycomb Card Dolls for my Mum


  • Made this Honeycomb Doll card for a Birthday Gift

  • As you can see I have created my Diva Doll with a Sherri Ann Baldy's My Besties Head only. The first Diva is Wedding Doll My Besties and the second Doll is Besties Digi Image No. IMG031
 ~~~~~~~~~~~~~~~~~~~~~~~~~~~~~~~

  • (Picture No. 1) ~ So to create I firstly choose my Image which I would like to use the Head only I then cut My Besties head choice out very neatly.
  • (Picture No. 2) ~ Using my Copic Markers I color in the Face and Hair and at the same time I use my Body Template and cut out the upper body and I just color the area of the skin which will be seen on the Diva only, I do not color the areas which are hidden
  •  (Picture No. 3) ~ My next step is to choose my colors for the Honeycomb ~ I am using 80gsm Dark Aqua Blue and 80gsm Light Aqua Blue
  •  (Picture No. 4) ~ Using the lower large Skirt Pattern I cut out 18 Skirt Panels in the dark Aqua all right side up and I then mark the pattern glue lines all right side up
  • (Picture No. 5 & 6) ~ I then cut 17 Light Aqua lower Skirt Panels and mark the Glue Lines ~ I found it easier to pop a large paper clip on the skirt panels to keep them aligned and when I mark the top panel with a pencil the indentation mark will show up on the one underneath that way you have your guide, most important is not to mix up the two different pattern lines, only work on one skirt panel at a time as you will see the Dark Aqua Glue Lines are in a different position to the Glue Lines on the Light Aqua Pattern 
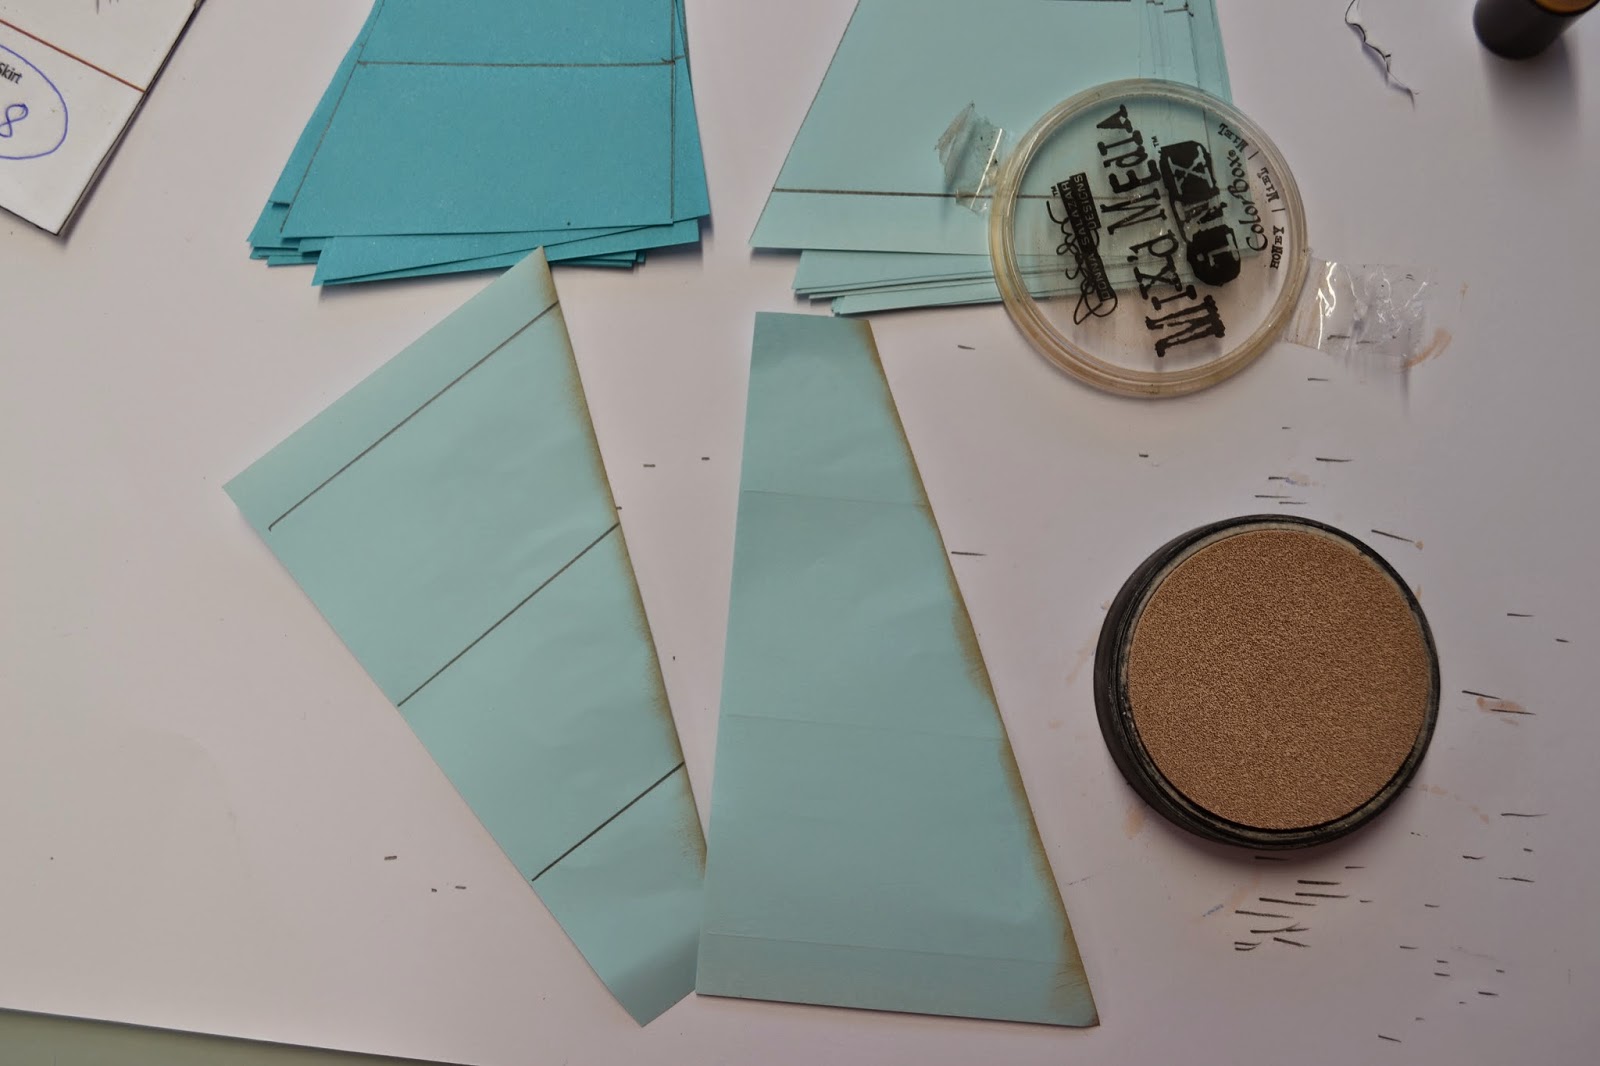
  • (Picture No. 7) ~ Before gluing the skirts panels, I have used my Mixed Media light brown ink pad to the edges of the front of the skirt ~ I found it easier to do this prior to gluing
  • (Picture No. 8) ~ Using a good quality Blue Glue I then run the glue pen along the marked lines on the Dark Aqua Skirt Panels, then I place the Light Blue Aqua Skirt panel on top keeping them all face side up (make sure you place these very carefully not to move or smudge the glue, this is very important for your end results when opening the Honeycomb up) ~ once you have your next panel on, glue the glue lines and keep rotating alternatively each colour gluing until you get to the last panel ~ leave the skirt now for the glue to completely dry
  • (Picture No. 9) ~ Repeat number 8 for the upper skirt panels
  • (Picture No. 10) ~ Cut out the Skirt on a good strong quality paper. I have used 220gsm Quill Stationery Paper to support my Honeycomb. I have also cut out from the 220gsm an additional body tapering it in so it cannot be seen behind the upper body which I have colored with my Copics. I join them all together with strong sticky tape plus I also use a Paddle Pop Stick for extra support so the Doll does not bend over and it keeps my doll upright and straight.
  • (Picture No. 11) ~ I then use double sided adhesive tape taping both outside panels of the Skirt plus I place double sided adhesive tape to the skirt panel also. 
  • (Picture No. 12) ~ I then position the skirt panels in the centre of support template and fold one side out and stick it down and then repeat with the other side.  At this point it is a good idea to attach your upper body and Corset before attaching the upper body Honeycomb as the body and Corset will sit under the Honeycomb and will give a much better finish. Once you have attached the upper body and the upper Skirt Honeycombe you can attach the head and hat and decorate to your own choice adding Ribbons/Flowers etc.  


Thank you for visiting my Diva Doll Tutorial today and I hope you have enjoyed this project.


Challenges entered: