Pages

Followers

Wednesday, 29 October 2014

Halloween Pink Easel

My Halloween Card


Recipe:
  • Cardstock: Bella Glitz from Spotlight
  • Cardstock: Kaisercraft 
  • Star Dies: Cheery Lynne
  • Angle Square Die: Mpress Nestling Dies
  • "October" Flair from Funky Flairs Studio "Months of the Year" Range
  • Digital 3D Image from Sherri Ann Baldy's My Besties
  • Banner from Spotlight
  • Cat from Google Halloween search
  • Halloween wording from "Bewitched" 12x12 
  • 31st ~ White Gel Pen
  • Pink Banner from "Bewitched" 12x12
  • Spider Red Pearl/Wobble Eyes Spotlight/Legs Spotlight
  • Stitching edging: Black and White Gel Pens from Office Works


Entry No. ~ Die Cuttin' Divas Challenge ~ Halloween

Monday, 27 October 2014

Christmas Easel Card

Embossed Xmas Easel Card
Recipe:
  • Sherri Ann Baldy's My Besties Christmas Wonderland "Christmas Lights"
  •  Merry Merry Christmas Stamp with Christmas Green Embossing Powder
  • Snow Flakes White Chunky Embossing Enamel
  • Box Decorations, Stars and Christmas Decorations from stash
  • Snow ~ Instant Snow
  • True Snow "Aleene's"
  • Vellum Dot
  • Pearl Glitter Glue 
  • Silver Glitter Glue
  • Bow ~ Sue Wilson Die
  • Red & White Dot Designer Paper Franchville Primary Basics 12x12
  • White Gel Pen
  • Gold Gel Pen on Plastic Corners
  • Santa and Brick Chimney "Hobby Fun" 12x12 Christmas Paper
  • Bella Glitz 12x12 Cardstock "Green" and "Pearl White"
  • Copics: E000 E00 E43 R20 W0 W3 B100 R14 R27
  • Kaisercraft Cardstock Easel Base
Theme ~ Embossing (Wet or Dry)
Entry No. 35 ~ 613 Avenue Create # 95 ~ Bags/Tags/Boxes Anything Goes
Ends: 1/11/14
http://avenue613.blogspot.com.au/2014/10/challenge-95-anything-goes-woptional.html 

Entry no. 97 ~ All Sorts Challenge # 282 ~ Christmas
Ends: 31.10.14
http://allsortschallenge.blogspot.com.au/2014/10/week-282-christmas.html 

Showcase Pick
Entry No. 1 ~ PDE Linky Party ~ Easel Cards
Ends 3/11/14
http://pdelinkyparty.blogspot.com.au/2014/10/easel-cards.html 

Entry No. 20 ~ Through the Craftroom Door ~ Anything Goes
Ends: 4/11/14
http://www.ttcrd.blogspot.com.au/ 

Entry No. 14 ~ Christmas Stampin' All Year round
Ends: 31/10/14
http://christmasstampin.blogspot.com.au/2014/10/challenge-34-photo-inspiration_77.html

Sunday, 26 October 2014

Meet at the Scrappers Corner for Scrapping Fun

  • Come along and join our very friendly Facebook Scrappers Group and have some fun, meet wonderfully talented people and enjoy the tutorials and share your creations and wins.
  • The group is opened to all work and not just Besties.
  • We run a monthly My Besties Card Challenge with great awards and prizes.
  • To enter our challenges you must be a Member of Meet at the Scrappers Corner to be eligible.

Link for Meet at the Scrappers Corner:

Link for our Monthly Card Challenge:

  • Please come and visit our friendly Group you are most welcomed.
  • Share your projects/creations and also show the members your talent and display any of your projects.
  • Meet at the Scrappers Corner is not a selling site but we do allow Links to selling Sites for all Scrapping requirements.
  • We have a wonderfully talented group of Ladies on our Design Team and would love you to visit their blogs too
 Angela


Antoinette

Jane


Eleonora

Sue

Debbie


  • Thank you for visiting this blog today and hope to see you soon on Meet at the Scrappers Corner ~ please feel welcomed to visit the Design Team Blogs and leave comments and most of all hope you have a blessed day.

Kindest regards,

Annette 
 Annette Stapylton ~ Design Team Leader for


Friday, 24 October 2014

Halloween Bendi Card ~ 3D Dec DT

(Bendi Fold) Halloween 3D Decoupage
3D Deco Challenge # 19 More than One Fold


Recipe:
  •  3D Decoupage Sherri Ann Baldy's My Besties 3D Halloween No. 1 Decoupage
  • Spiders/Black Cat/Black Bats/Witch on Broom/Spider Web off Google search
  • Black Cardstock Kaisercraft
  • Black Fence: Cricut Cartridge "Bloom"
  • White Fern: Die Impression Obsession Dies No. DIE21-N
  • Ghost and Boo from The Bewitched Stack 12x12 Book
Top 3
Entry No. 20 ~ Creative Moments Challenge # 54 ~ Halloween
Ends: 3/11/14
http://carabbiemomentsofcraft.blogspot.co.uk/2014/10/challenge-54-anything.html 

The Paper Shelter Challenge # 179 ~ Halloween
Ends: 28/10/14
http://thepapershelter.blogspot.com.au/2014/10/challenge-179-halloween.html 

Top 3 Winner
Entry No. 3 ~ Scrap Creations Going Grey with Scrap Creations ~ Halloween
Ends: 5/11/14
http://scrap-creations1.blogspot.com.au/2014/10/going-grey-with-scrap-creations.html 

DT Winner
Entry No. 53 ~ Artistic Inspirations Challenge #114 ~ Halloween
Ends: 26/10/14
http://artisticinspirationschallenges.blogspot.co.uk/2014/10/challenge-114-halloween-anything-goes.html 

3rd Prize and Guest DT for Crafty Boots on 15th December 2014
Crafty Boots Challenge ` 13th october Fall Leaves and Halloween
Entry No. 87
Ends: 26/10/14
http://craftybootschallenges.blogspot.com.au/2014/10/falling-leaves-and-halloween.html 

Monday, 20 October 2014

Shaker Card ~ SBC


"Shaker Card"


Recipe:
  • Shaker Card Tutorial: https://www.youtube.com/watch?v=xTh5PtVI9yQ
  • Porta Craft Pearl Boarder
  • Dies:  Spellbinders Nestabilities Decorative Elements
  • Nellie's Multi Frames MDF012
  • Kaisercraft Cardstock
  • Vellum
  • Stamp: JustRite CL-03535 "Always & Forever Medallion Labels
  • In: Creativ "Mauve" and  Dew Drop Brilliance "Mediterranean Blue"  
  • Mauve and Navy Beads from Spotlight

Friday, 17 October 2014

Halloween 3D

Halloween 3D

Recipe:
  • Sherri Ann Baldy's 3D Decoupage Digi Witch
  • Bliss Glitz Cardstock
  • Kaiser Cardstock
  • Pink Spot from Grace Taylor Bright Young Things Collection 12x12
  • Green Check from Best of Studio Calico Inspiration 12x12
  • Spiders hand made from Kaiser Black Cardstock , Chenille Wire Legs from Easy Peasy (Spotlight), Eyes from Spotlight and Nose Red 8mm Pearl from Debs USA.
  • Signpost: Spotlight DIY Shop (American Crafts)
  • Halloween signs from "The Bewitched Collection" 12x12 
  • Silver Glitter Glue trim on Spiders

 Entry No. 4 ~ Decorate to Celebrate # 86 ~ Anything goes 3D
Ends: 29/10/14
http://decoratetocelebrate.blogspot.com.au/ 

Entry No. 11 ~ The Paper Shelter # 178 ~ Monsters and/or Mythicals
Ends:
http://thepapershelter.blogspot.com.au/2014/10/morning-to-you-all-i-hope-you-feel-way.html 

Entry No. 60 ~ Jenny's Paper Craft Challenge # 199 ~ anything goes
Ends 22/10/14
http://pennyschallenges.blogspot.com.au/2014/10/welcome-to-pennys-challenge-199-and-dt.html 

Entry No. 3 ~ QKR Stampede Challenge # 109 "The Witch Is In"
Ends: 25/10/14
http://qkrstampede.blogspot.com.au/2014/10/qkr-stampede-challenge-109the-witch-is.html 

Entry No. 124 ~ Simply Create Too Challenge # 72 ~ "Halloween"
Ends: 24/10/14
http://simplycreatetoo.blogspot.com.au/2014/10/mid-post-halloween-or-orange-challenge.html 

Thursday, 16 October 2014

Diva Doll Tutorial ~ SBC

Hello Friends,

Annette here for the Scrapbook Blessings Club and I am featuring here today a wonderful creation which I found recently in the Cardmaking Magazine.
There are full instructions on how to make this Diva Doll but I have made mine with a twist.
This is the Doll which was featured by the Magazine and created by master sculptor Greg Sukendro :-
  • This is my interpretation where I utilized Greg Sukendro's Honeycomb Pattern plus the body pattern (but I have made some slight amendments to the patterns to suit my own Diva Doll):-

  • As you can see I have created my Diva Doll with a Sherri Ann Baldy's My Besties Head only. The first Diva is Wedding Doll My Besties and the second Doll is Besties Digi Image No. IMG031
 ~~~~~~~~~~~~~~~~~~~~~~~~~~~~~~~

  • (Picture No. 1) ~ So to create I firstly choose my Image which I would like to use the Head only I then cut My Besties head choice out very neatly.
  • (Picture No. 2) ~ Using my Copic Markers I color in the Face and Hair and at the same time I use my Body Template and cut out the upper body and I just color the area of the skin which will be seen on the Diva only, I do not color the areas which are hidden
  •  (Picture No. 3) ~ My next step is to choose my colors for the Honeycomb ~ I am using 80gsm Dark Aqua Blue and 80gsm Light Aqua Blue
  •  (Picture No. 4) ~ Using the lower large Skirt Pattern I cut out 18 Skirt Panels in the dark Aqua all right side up and I then mark the pattern glue lines all right side up
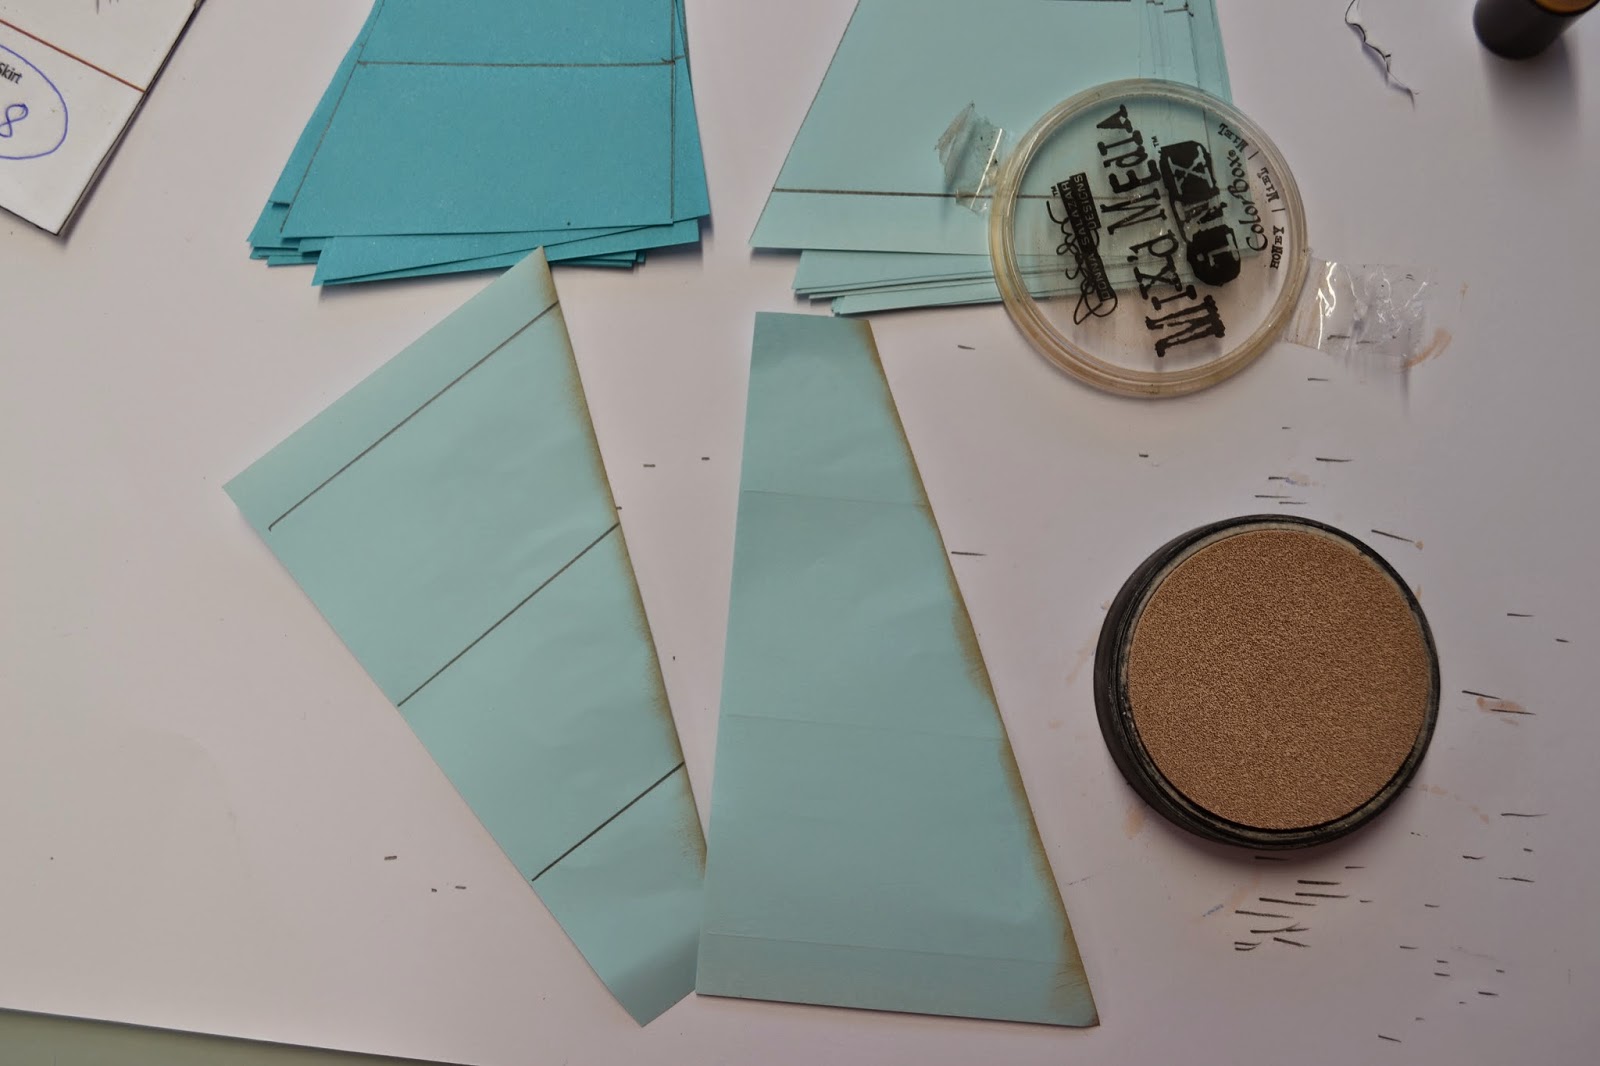
  • (Picture No. 5 & 6) ~ I then cut 17 Light Aqua lower Skirt Panels and mark the Glue Lines ~ I found it easier to pop a large paper clip on the skirt panels to keep them aligned and when I mark the top panel with a pencil the indentation mark will show up on the one underneath that way you have your guide, most important is not to mix up the two different pattern lines, only work on one skirt panel at a time as you will see the Dark Aqua Glue Lines are in a different position to the Glue Lines on the Light Aqua Pattern 
  • (Picture No. 7) ~ Before gluing the skirts panels, I have used my Mixed Media light brown ink pad to the edges of the front of the skirt ~ I found it easier to do this prior to gluing
  • (Picture No. 8) ~ Using a good quality Blue Glue I then run the glue pen along the marked lines on the Dark Aqua Skirt Panels, then I place the Light Blue Aqua Skirt panel on top keeping them all face side up (make sure you place these very carefully not to move or smudge the glue, this is very important for your end results when opening the Honeycomb up) ~ once you have your next panel on, glue the glue lines and keep rotating alternatively each colour gluing until you get to the last panel ~ leave the skirt now for the glue to completely dry
  • (Picture No. 9) ~ Repeat number 8 for the upper skirt panels
  • (Picture No. 10) ~ Cut out the Skirt on a good strong quality paper. I have used 220gsm Quill Stationery Paper to support my Honeycomb. I have also cut out from the 220gsm an additional body tapering it in so it cannot be seen behind the upper body which I have colored with my Copics. I join them all together with strong sticky tape plus I also use a Paddle Pop Stick for extra support so the Doll does not bend over and it keeps my doll upright and straight.
  • (Picture No. 11) ~ I then use double sided adhesive tape taping both outside panels of the Skirt plus I place double sided adhesive tape to the skirt panel also. 
  • (Picture No. 12) ~ I then position the skirt panels in the centre of support template and fold one side out and stick it down and then repeat with the other side.  At this point it is a good idea to attach your upper body and Corset before attaching the upper body Honeycomb as the body and Corset will sit under the Honeycomb and will give a much better finish. Once you have attached the upper body and the upper Skirt Honeycombe you can attach the head and hat and decorate to your own choice adding Ribbons/Flowers etc.  


Thank you for visiting my Diva Doll Tutorial today and I hope you have enjoyed this project.

For any questions you may like to ask, please leave in the comments section and I will endeavour to respond as soon as possible.

I hope you can also join us at our Scrapbook Blessings Club and be blessed with this Tutorial.


As always, any comments are very much appreciated. 
Thank you for stopping by and have a wonderful day.


Hope you have a blessed day and thanks for stopping by,
 
 
Annette ~ http://annetteshobbyrosettes.blogspot.com.au/


Handbag Card

"Wish" Flair Handbag

 Recipe:
  • Funky Flairs Studio ~ "Wish" Flair from the Quote Notes Range
  • Calico hand made Flower from Funky Flairs ~ I have inked the edges with Brown Ink
  • Flower Edging ~ Ionic hand punch
  • Light Brown Kaisercraft Cardstock
  • Beaded Chain
  • 1" Pair Ribbon from "The Reject Shop"
  • 1/2" Blue Spotted Ribbon Spotlight
  • Mulberry Paper Flower ~ Cream


Sunday, 12 October 2014

Blue Honeycomb Diva Doll

Made this Honeycomb Diva Doll for Challenges
  
Recipe:
  
  •  Diva Doll Head I have used Sherri Ann Baldy's My Besties Wedding Doll
  • I have used pattern templates issued in "Cardmaking" with Paper Sculpture by master sculptor Greg Sukendro
  • 80gsm Dark Aqua and Light Aqua papers
  • 220gms Quill for skirt and body support
  • Silk Wired Ribbon
  • Aqua Mulberry Paper Flowers
  • Brown Kaisercraft Cardstock
  • Paddle Pop Stick for back support
  • Aqua Ties
  • Mixed Media light brown Ink for enhancement
  • Mini Pearls for Earring and Necklace
  • Copics: C000 C00 C21 R20 G82
 
Entry No. 259 ~ Crafting at the Weekend ~ Anything Goes
Finishes on: 24/10/14

Entry No. 79 ~ Craft my Life ~ Anything Goes
Finishes on:
http://www.sparklingblackrose-craftmylife.blogspot.co.uk/2014/10/all-crafts-challenge-octobernovember.html 

Entry No. 41 ~ Crafting from the Heart ~ Anything Goes
Ends: 20/10/14
 http://www.sparklingblackrose-craftmylife.blogspot.co.uk/2014/10/all-crafts-challenge-octobernovember.html

Entry No. 55 ~ Dream Valley Challenge # 92 ~ Anthing but a Card
Ends: 
http://dreamvalleychallenges.blogspot.ca/2014/10/challenge-92-anything-but-card.html 

Entry No. ~ Imagination Crafts Challenge Anything goes
Ends:
http://imagination-craftschallenges.blogspot.com.au/2014/10/october-imagination-crafts-challenge.html 

Entry No.
The Mirror Crack'd Challenge #2 "The body Beautiful"  Something Featuring the Human Form
http://www.themirrorcrack1d.blogspot.co.uk/2014/10/2-body-beautiful-something-featuring.html#comment-form


Entry No. 72 ~ Craft my Life ~ Anything Goes
Finishes on:
http://www.sparklingblackrose-craftmylife.blogspot.co.uk/2014/10/all-crafts-challenge-octobernovember.html

Friday, 10 October 2014

Bathroom 3D

Bathroom 3D Scene
Receipe:
  • 3D by Sherri Ann Baldy's My Besties 
  • Kaisercraft Card Stock
  • Wallpaper: Cre8tiv Mini Stack 150x150 Item No. 705/212840
  • White Lace from Sullivans 1+1/4" Width
  • 1/4" White Satin Tie Back Ribbons
  • White Wedding Veil Netting from Spotlight
  • Flower on Bath Liquid Pearls Orchid
  • Bath: Pearl Glitter Blue plus Copics to enhance: C1 
  • Bubbles: True White Snow ~ White Glitter 
  • Water in Bath: B12 Copic with Pearl Glitter
  • Copics to enhance: Hair E15
  • Copics to enhance: Ribbon G82 YG63
  • Copics to enhance Face: E11 R20
  • Mirror: White Kaisercraft and Cre8tiv Metalic Paper Silver
  • Mirror Die: Spellbinders S5-145
  • Window Die: Spellbinders S2-016
  • Screen Die: Marianne Design Silver Selection CR266
  • Corner White Boarder Die: Cheeri Lynn Designs
  • Die for Box Top: Nellie's Multi Frames MFD012
  • Die for Dress Dummy is Spellbinders S5-145
  • Heavy Vellum used in Window Frame
  • Purple Rhinestone Wall Boarders from The Reject Shop
  • Pearls 8mm
  • Purple 8mm Rhinestones String Blings from House2Home
  •  1" Silver Plastic Heart from stash
 Entry No. 49 ~ Fab'n'Funky Challenge # 232 ~ "Anything with Ribbon"
Finishes: 14/10/14
http://fabnfunkychallenges.blogspot.com.au/2014/10/challenge-232-anything-with-ribbon.html 

Entry No. 27 ~ Love To Create Challenge # 136 ~ Dies and Sparkle
Finishes on: 13/10/14
http://lovetocreatechallenge.blogspot.com.au/2014_10_01_archive.html 

Entry No. 4 ~ Sweet 7 Digital Challenge # 5 ~ Sassy
Finishes on 28/10/14
http://sweet7challenge.blogspot.com.au/2014/10/challenge-5-sassy.html 

Entry No. 9 ~ A Gem of a Challenge # 130 ~ Create a Scene
Finishes on 23/10/14
http://pinkgemchallengeblog.blogspot.com.au/2014/10/challenge-130-create-scene.html 

Entry No. 17 ~ Artistic Inspiration ~ Make your own background
Ends: 21/10/14
http://artisticinspirationschallenges.blogspot.co.uk/2014/10/challenge-113-anything-goes-make-your.html 

Entry No. 49 ~ Imagination Crafts Anything goes
Ends: 31/10/14
http://imagination-craftschallenges.blogspot.com.au/2014/10/october-imagination-crafts-challenge.html 

Entry No. 61 ~ Penny's Paper Craft # 199 ~ Anything Goes
Ends: 22/10/14
http://pennyschallenges.blogspot.com.au/2014/10/welcome-to-pennys-challenge-199-and-dt.html 


Saturday, 4 October 2014

Stand Up Diamond Fold Card ~ KennyK Digi

Diamond Fold Stand Up Card
Featuring KennyK Digital Stamp

Recipe:
  • KennyK Digital Stamp
  • 6mm Pink Pearls from Jemark Forever Pearls
  • 6mm Ivory Pearls from PortaCraft 
  • Rhinstone Pink Crystals from Sullivans
  • Pink Crystal Rhinestone Flowers from Say It In Crystals
  • Embellishment Mauve Bling Handbag Stuck on Craft
  • Designer Paper from old Stash
  • Die: Doily Die Spellbinders Nestabilities S4-292
  • White Cardstock from Kaisercraft
  • Corner Die Cuts ~ Spellbinders Shapeabilities S5-071
  • Copics: E15 E41 E000 E00 E35 R20 R27 V12 BV00 G82 

Entry No. 1 ~ Chocolate Coffee and Cards Challenge #75 High Heels & Purse
Finishes on: 17/10/14
http://chocolatecoffeecards.blogspot.com.au/2014/10/challenge-75-high-heels-purses.html