Pages

Followers

Showing posts with label Friday Cards. Show all posts

Thursday, 13 November 2014

Bendi Fold Card Tutorial ~ SBC DT


Hello Friends,

Annette here for the Scrapbook Blessings Club and today for Friday's Cards.

I would like to feature teh Bendi Fold card I found on Split Coaster Stampers some time ago.

To date I have made 4 Bendi Fold Cards for DT and Challenge Projects.

For the members who would like the Tutorial on making the Bendi Fold Card I will include the Tutorial Link on here today.


Tip of the Day: Instead of cutting separate pieces for the Bendi Fold Card, make your Bendi Fold Card into one piece as this saves joining.

Now onto my project:-

*********************
Here are 3 of my 4 Bendi Folded Card creations I made 

For the Split Coast Stampers Tutorial here is the link:
http://www.splitcoaststampers.com/resources/tutorials/bendifold/


  • Today my Tutorial I will be featuring the making of Bendi Fold Photo No. 3 the 3D Christmas Snow Hill Skater
  • For the making of my Bendi Fold Card I am making my main base Bendi Fold Card into one piece pattern instead of 3 individual patterns where they have to be joined together. I have purchase a large sheet of white cardboard from my local newsagent and worked out my pattern and made one piece.
 * * * * * * * *
  • Once I have established my sizes I create my one piece Bendi Fold Card Pattern plus I mark the cut lines for the slots and I cut the slots with my mini paper cutter

  • I then Score the fold lines with my Score-Pal

  • This is how the Bendi Fold card looks once assembled ~ this is just a sample of the card I have cut and folded
  • Now I cut my 3 pieces to cover the front sections of my Bendi Fold Card from White Kaisercraft Cardstock

  • If you are making a Bendi Fold Card an not using Cotton Wool Snow as I am in this Tutorial ~ run these pieces through an Embossing Folder before attaching
  • Attach the Cardstock sections to the Bendi Card with double sided adhesive
  • For my sloping snow hill I have use my Spellbinders Scallop Board Die to give the slope to the snow hill ` but of course I have prepared mine before embossing and joining etc.


  • This is how my Bendi Fold Card looks prior to decorating


  • I then glue my Cotton Wool into all the areas to resemble snow and then I add my boarder Fence
  • I continue to decorate my Bendi Fold Card adding trees and whatever embellishments I desire to my project


  • I add here a paddle Pop Stick to support my 3D Image which I have suspended to the stick with double sided adhesive, the paddle Pop Stick also give the 3D support and keeps it nice and upright. I continue to decorate.


  • And here is my finished project complete 


Thank you for visiting my Bendi Fold Card Tutorial today and I hope you have enjoyed this project.
For any questions you may like to ask, please leave in the comments section and I will endeavour to respond as soon as possible.

I hope you can also join us at our Scrapbook Blessings Club and be blessed with this Tutorial.

Also, you can join up to our Facebook group: Scrapbook Blessings Club for more fun, games, inspiration, tips and techniques.


As always, any comments are very much appreciated. 
Thank you for stopping by and have a wonderful day.


Hope you have a blessed day and thanks for stopping by,
 
 
Annette ~ http://annetteshobbyrosettes.blogspot.com.au/


Thursday, 6 November 2014

Folded Wedding Card Tutorial ~ SBC DT


Hello Friends,

Annette here for the Scrapbook Blessings Club and today for Friday's Cards I would like to feature a pre-packed folded Card which I purchased and how I have created my project with it.


Tip of the Day: Use Tabs with stand up folded Cards to keep them upright and firm.

Now onto my project:-


My completed Project :-

  • This folded card I have created from a packet of pre-packed folded cards I purchased 
 * * * * * * * * * *
  • This is the original pre-packed Card that I have taken out of the packet for my project ~ It has two folds with 3 small windows as you can see in the two photographs hereunder :-

  • In this next step with the front fold I score it in half with my Scor-Pal and fold


  • Although the pre-packed card already has some fine embossing ~ I still like to go over this with one of my Embossing Folders and I do this in sections as the Card is too large to fit into the Embossing Folder in one go so I generally run it through my Embosser about 3 or 4 times just moving the Embossing folder in sections
  •  I have decided to glue some fine white wedding veil netting behind my little windows but I do not want the 3 windows so I am going to de-face this card by cutting out the two window bars and making it look like one long wide window


  • As I find with my Embellishments being extremely heavy for this pre-packed card to hold and stand upright firmly, I have had to stabilize the card with some Tabs for support as you can see in the next photo ~ I have cut these Tabs and adhered them with double sided adhesive Tape ~ this way my card will not collapse once I have decorated it  ~ Note I have also placed center folds in my Tabs ~  this enables the card to fold down properly but still gives the card proper support when standing upright fully embellished


  • Now my card is ready for decorating and this is my finished product :


Thank you for visiting my Folded Wedding Card Tutorial today and I hope you have enjoyed this project.

For any questions you may like to ask, please leave in the comments section and I will endeavour to respond as soon as possible.

I hope you can also join us at our Scrapbook Blessings Club and be blessed with this Tutorial.

Also, you can join up to our Facebook group: Scrapbook Blessings Club for more fun, games, inspiration, tips and techniques.


As always, any comments are very much appreciated. 
Thank you for stopping by and have a wonderful day.


Hope you have a blessed day and thanks for stopping by,
 
 
Annette ~ http://annetteshobbyrosettes.blogspot.com.au/


Thursday, 16 October 2014

Diva Doll Tutorial ~ SBC

Hello Friends,

Annette here for the Scrapbook Blessings Club and I am featuring here today a wonderful creation which I found recently in the Cardmaking Magazine.
There are full instructions on how to make this Diva Doll but I have made mine with a twist.
This is the Doll which was featured by the Magazine and created by master sculptor Greg Sukendro :-
  • This is my interpretation where I utilized Greg Sukendro's Honeycomb Pattern plus the body pattern (but I have made some slight amendments to the patterns to suit my own Diva Doll):-

  • As you can see I have created my Diva Doll with a Sherri Ann Baldy's My Besties Head only. The first Diva is Wedding Doll My Besties and the second Doll is Besties Digi Image No. IMG031
 ~~~~~~~~~~~~~~~~~~~~~~~~~~~~~~~

  • (Picture No. 1) ~ So to create I firstly choose my Image which I would like to use the Head only I then cut My Besties head choice out very neatly.
  • (Picture No. 2) ~ Using my Copic Markers I color in the Face and Hair and at the same time I use my Body Template and cut out the upper body and I just color the area of the skin which will be seen on the Diva only, I do not color the areas which are hidden
  •  (Picture No. 3) ~ My next step is to choose my colors for the Honeycomb ~ I am using 80gsm Dark Aqua Blue and 80gsm Light Aqua Blue
  •  (Picture No. 4) ~ Using the lower large Skirt Pattern I cut out 18 Skirt Panels in the dark Aqua all right side up and I then mark the pattern glue lines all right side up
  • (Picture No. 5 & 6) ~ I then cut 17 Light Aqua lower Skirt Panels and mark the Glue Lines ~ I found it easier to pop a large paper clip on the skirt panels to keep them aligned and when I mark the top panel with a pencil the indentation mark will show up on the one underneath that way you have your guide, most important is not to mix up the two different pattern lines, only work on one skirt panel at a time as you will see the Dark Aqua Glue Lines are in a different position to the Glue Lines on the Light Aqua Pattern 
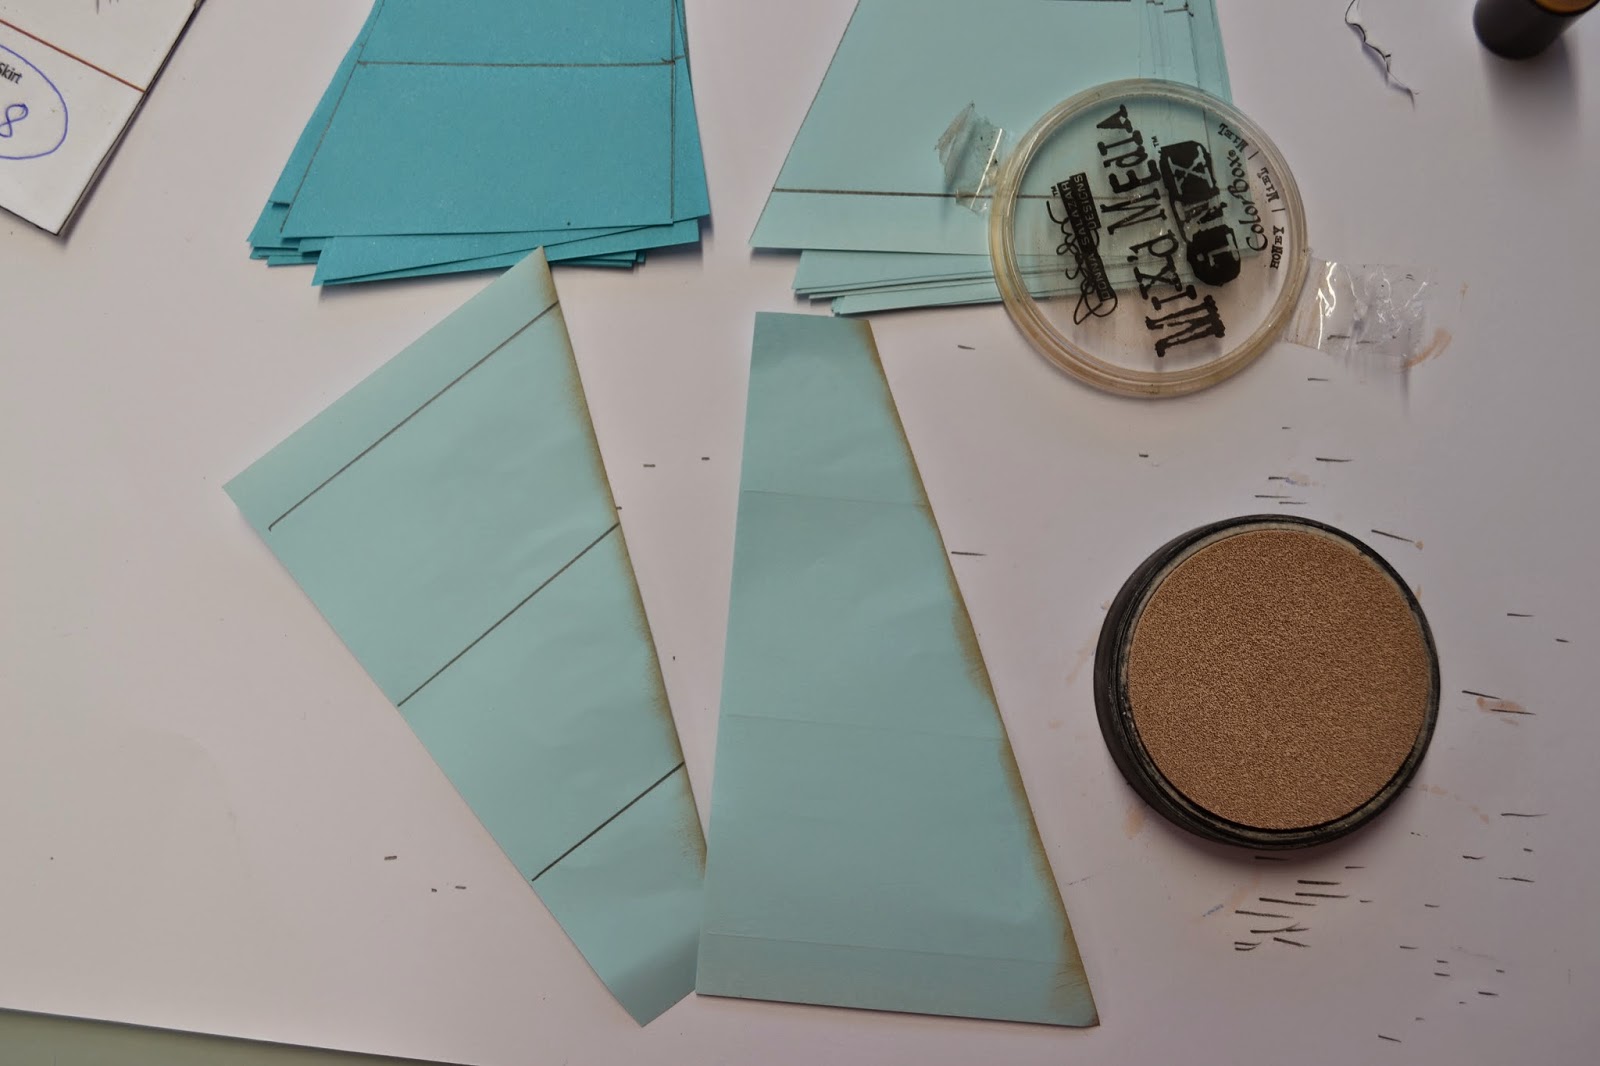
  • (Picture No. 7) ~ Before gluing the skirts panels, I have used my Mixed Media light brown ink pad to the edges of the front of the skirt ~ I found it easier to do this prior to gluing
  • (Picture No. 8) ~ Using a good quality Blue Glue I then run the glue pen along the marked lines on the Dark Aqua Skirt Panels, then I place the Light Blue Aqua Skirt panel on top keeping them all face side up (make sure you place these very carefully not to move or smudge the glue, this is very important for your end results when opening the Honeycomb up) ~ once you have your next panel on, glue the glue lines and keep rotating alternatively each colour gluing until you get to the last panel ~ leave the skirt now for the glue to completely dry
  • (Picture No. 9) ~ Repeat number 8 for the upper skirt panels
  • (Picture No. 10) ~ Cut out the Skirt on a good strong quality paper. I have used 220gsm Quill Stationery Paper to support my Honeycomb. I have also cut out from the 220gsm an additional body tapering it in so it cannot be seen behind the upper body which I have colored with my Copics. I join them all together with strong sticky tape plus I also use a Paddle Pop Stick for extra support so the Doll does not bend over and it keeps my doll upright and straight.
  • (Picture No. 11) ~ I then use double sided adhesive tape taping both outside panels of the Skirt plus I place double sided adhesive tape to the skirt panel also. 
  • (Picture No. 12) ~ I then position the skirt panels in the centre of support template and fold one side out and stick it down and then repeat with the other side.  At this point it is a good idea to attach your upper body and Corset before attaching the upper body Honeycomb as the body and Corset will sit under the Honeycomb and will give a much better finish. Once you have attached the upper body and the upper Skirt Honeycombe you can attach the head and hat and decorate to your own choice adding Ribbons/Flowers etc.  


Thank you for visiting my Diva Doll Tutorial today and I hope you have enjoyed this project.

For any questions you may like to ask, please leave in the comments section and I will endeavour to respond as soon as possible.

I hope you can also join us at our Scrapbook Blessings Club and be blessed with this Tutorial.


As always, any comments are very much appreciated. 
Thank you for stopping by and have a wonderful day.


Hope you have a blessed day and thanks for stopping by,
 
 
Annette ~ http://annetteshobbyrosettes.blogspot.com.au/


Thursday, 2 October 2014

Friday Cards ~ Heart Box Easel Card Tutorial

Hello Friends,

Annette here for Scrapbook Blessings Club and today I am featuring a recent find I made with Gift box Easel Cards.

Tip of the Day: Make up your Easel separately to the Platform for extra strength to hold the weight of your embellishments, boxes and digi's. Refer to my tutorial below.

Now onto my Heart Box Easel Card:-

Heart Box Easel Card ~ Made this for Challenges

I recently discovered Gift Box Easel Cards and have made up two Xmas Gift Box Easel Cards for a couple of my DT Projects recently. I wanted to try something completely different to what I and also other people had made so I thought up the idea of making a Heart Box Easel Card. I have studied various techniques and styles of boxes but ended up working for two days on my own design as the heart box styles I downloaded from Google search just did not suit my requirements. 

I started off with my Cherry Lynn Hearts Dies utilizing various sizes ensuring I had a top and bottom heart, I then cut a strip and scored along the strip and cut out "V" sections to curve around the lower part of the heart. Once I had the bottom heart attached with the heart box wall I then went around the edge with the glue gun of the top heart and glued it to the box. 

I then attached Ribbon and printed paper with double sided adhesive around the box heart then rolled a heart cut shape over the box to give it extra lacy effect. 

I then stacked up my heart boxes and completed my Heart Box Easel Card.
The Easel itself is actually separate to the platform, this being to stabilize it with all of the weight of my heart box and Digital etc. I have layered extra Cardstock on the front and back side of the walls of the Easel to give it strength and support. 

The platform I have cut out a separate piece of cardstock and then attached the Easel with double sided adhesive to the platform then decorated my Easel.


  •  See separate Easel attached to the Platform
  • Heart Boxes
  • My completed Heart Box Easel Card Project ready for my Challenges


Recipe:
  • Sherri Ann Baldy's My Besties Digi Stamp
  • Copics: E000, E41, E00, E11, R20, R27, R14, E59, E15 & G82
  • Kaisercraft Cardstock
  • Bella Glitz Cardstock
  • Red and White Check Designer from old stash
  • White Gel Pen
  • Gold Corners covered with Gold Gel Pen
  • Gold Heart
  • 1/2" Red Satin Ribbon
  • 1" White Check Ribbon
  • Red and White Mulberry Paper Flowers
  • Die: Cherry Lynn Hearts ~ Various Sized Hearts
  • Heart Boxes hand made
  • Heart Embossing Folder
  

Thank you for visiting my Die Tutorial today and I hope you have enjoyed this project.

For any questions you may like to ask, please leave in the comments section and I will endeavour to respond as soon as possible.

I hope you can also join us at our Scrapbook Blessings Club and be blessed with this Tutorial.


As always, any comments are very much appreciated. 
Thank you for stopping by and have a wonderful day.


Hope you have a blessed day and thanks for stopping by,


Annette ~ http://annetteshobbyrosettes.blogspot.com.au/